射线检测算法在游戏中应用
笔者介绍:姜雪伟,IT公司技术合伙人,IT高级讲师,CSDN社区专家,特邀编辑,畅销书作者,国家专利发明人;已出版书籍:《手把手教你架构3D游戏引擎》电子工业出版社和《Unity3D实战核心技术详解》电子工业出版社等。
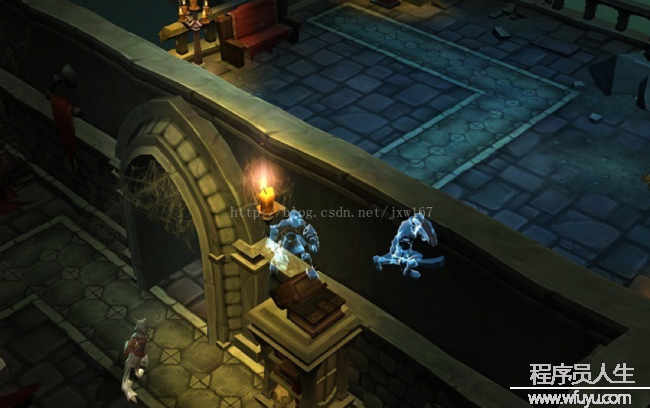
射线检测在游戏中使用的非常广泛,我们利用射线开发时,开发者只是调用引擎的接口便可实现,但是我们要了解其内部实现原理,这样我们也能够自己封装射线检测算法,射线检测算法利用程度非常高,不论是使用鼠标还是触摸屏,都需要用到射线检测,比如在虚拟仿真中,导弹追踪物体时,它需要通过从导弹上发出的射线1直朝向物体,角色寻路也能够通过在身体发出的射线检测与物体本身的碰撞盒接触后,用于查看物体是不是产生了碰撞。射线检测还用于对物体身上的材质处理,比如墙体的遮挡关系,使用摄像机发出的射线方向指向角色,如果它们之间的射线检测到物体比如墙体,可以编写逻辑改变角色的材质进行透明处理,效果以下图所示:
固然我们也能够使用对墙体进行透明设置,这也是1种处理方式,是将墙体进行透明设置效果以下图所示:
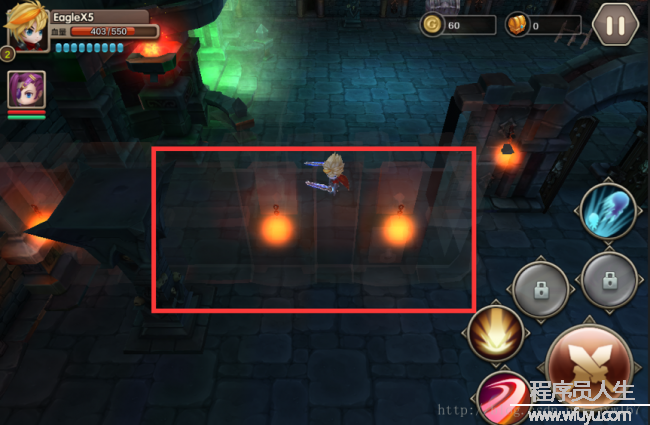
其在程序中表现的效果以下所示:
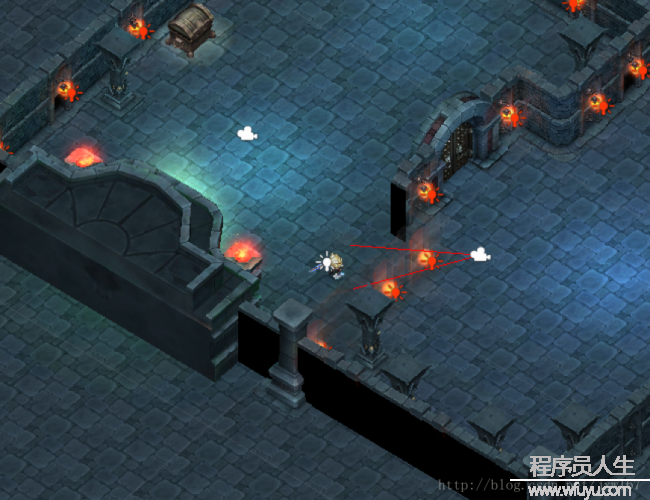
从相机发出两条射线,射线与墙体的碰撞体产生接触,程序会改变墙体的Shader,替换其材质,让其透明。以下是Unity3D引擎使用案例,核心代码以下所示:
 if (Physics.Linecast(pos, transform.position, out hit))
            {
                last_obj = hit.collider.gameObject;
                int length = last_obj.transform.childCount;
                string name_tag = last_obj.tag;

                if (name_tag == "wall")
                {
                    Material mat = new Material(Shader.Find("Transparent/Diffuse"));

                    curr_obj = last_obj;
                    for (int i = 0; i < length; i++)
                    {
                        Transform child = last_obj.transform.GetChild(i);
                        child.GetComponent<Renderer>().material = mat;
                        mat.mainTexture = (Texture)Resources.Load("Atlas/test_pub_tm");
                    }

                }
}
射线也能够用于物体的拾取操作,拾取物体时从触摸点发出1条射线与要拾取的物体的包围盒产生碰撞,表示物体被拾取到。
下面给开发者介绍1下,射线碰撞的原理,把1个物体放到场景中做了1个局部坐标到世界坐标变换,效果以下图所示:
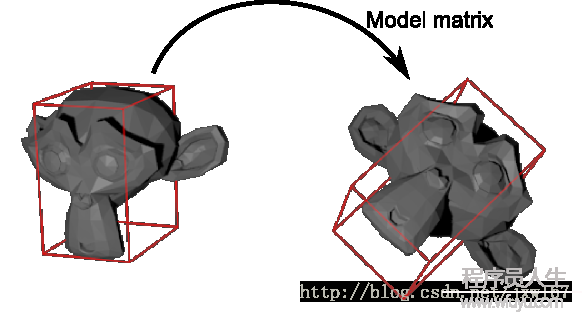
将物体投影后,假定红的表示X轴,绿的表示Y轴,中间表示物体的碰撞盒,1条射线穿过后效果以下所示:
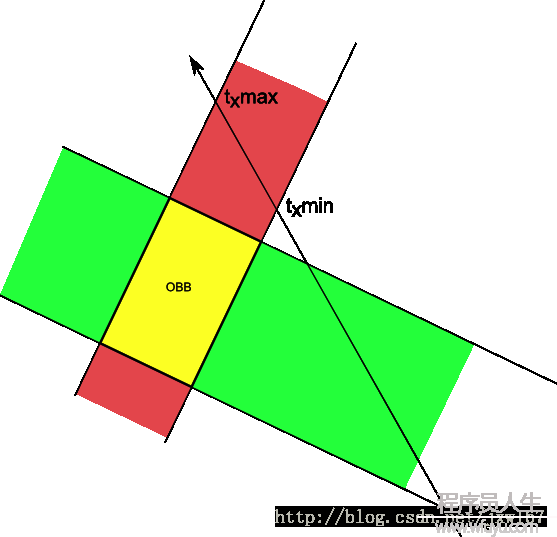
射线穿过我们要计算其是不是与碰撞盒产生碰撞,主要是通过射线与碰撞盒相交值的大小进行判断,效果以下图所示:

射线与碰撞体产生碰撞后的判定效果图以下所示:
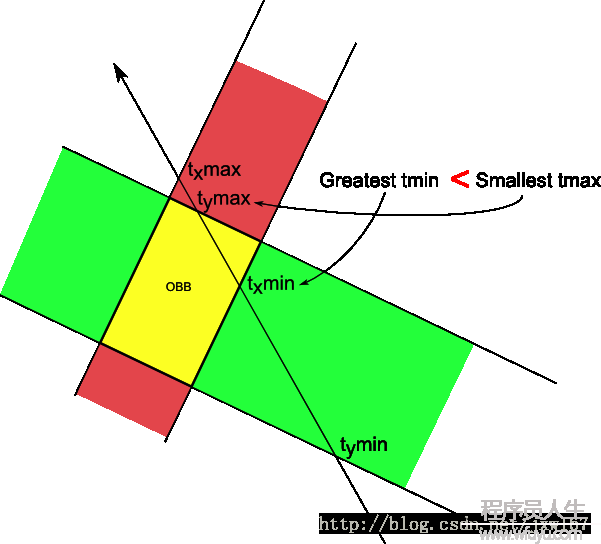
根据以上的判断我们可以写下代码,对3D物体,我们要分别判断X,Y,Z3个轴。核心代码以下所示:
bool TestRayOBBIntersection(
    glm::vec3 ray_origin,        // Ray origin, in world space
    glm::vec3 ray_direction,     // Ray direction (NOT target position!), in world space. Must be normalize()'d.
    glm::vec3 aabb_min,          // Minimum X,Y,Z coords of the mesh when not transformed at all.
    glm::vec3 aabb_max,          // Maximum X,Y,Z coords. Often aabb_min*⑴ if your mesh is centered, but it's not always the case.
    glm::mat4 ModelMatrix,       // Transformation applied to the mesh (which will thus be also applied to its bounding box)
    float& intersection_distance // Output : distance between ray_origin and the intersection with the OBB
){

    // Intersection method from Real-Time Rendering and Essential Mathematics for Games

    float tMin = 0.0f;
    float tMax = 100000.0f;

    glm::vec3 OBBposition_worldspace(ModelMatrix[3].x, ModelMatrix[3].y, ModelMatrix[3].z);

    glm::vec3 delta = OBBposition_worldspace - ray_origin;

    // Test intersection with the 2 planes perpendicular to the OBB's X axis
    {
        glm::vec3 xaxis(ModelMatrix[0].x, ModelMatrix[0].y, ModelMatrix[0].z);
        float e = glm::dot(xaxis, delta);
        float f = glm::dot(ray_direction, xaxis);

        if ( fabs(f) > 0.001f ){ // Standard case

            float t1 = (e+aabb_min.x)/f; // Intersection with the "left" plane
            float t2 = (e+aabb_max.x)/f; // Intersection with the "right" plane
            // t1 and t2 now contain distances betwen ray origin and ray-plane intersections

            // We want t1 to represent the nearest intersection,
            // so if it's not the case, invert t1 and t2
            if (t1>t2){
                float w=t1;t1=t2;t2=w; // swap t1 and t2
            }

            // tMax is the nearest "far" intersection (amongst the X,Y and Z planes pairs)
            if ( t2 < tMax )
                tMax = t2;
            // tMin is the farthest "near" intersection (amongst the X,Y and Z planes pairs)
            if ( t1 > tMin )
                tMin = t1;

            // And here's the trick :
            // If "far" is closer than "near", then there is NO intersection.
            // See the images in the tutorials for the visual explanation.
            if (tMax < tMin )
                return false;

        }else{ // Rare case : the ray is almost parallel to the planes, so they don't have any "intersection"
            if(-e+aabb_min.x > 0.0f || -e+aabb_max.x < 0.0f)
                return false;
        }
    }


    // Test intersection with the 2 planes perpendicular to the OBB's Y axis
    // Exactly the same thing than above.
    {
        glm::vec3 yaxis(ModelMatrix[1].x, ModelMatrix[1].y, ModelMatrix[1].z);
        float e = glm::dot(yaxis, delta);
        float f = glm::dot(ray_direction, yaxis);

        if ( fabs(f) > 0.001f ){

            float t1 = (e+aabb_min.y)/f;
            float t2 = (e+aabb_max.y)/f;

            if (t1>t2){float w=t1;t1=t2;t2=w;}

            if ( t2 < tMax )
                tMax = t2;
            if ( t1 > tMin )
                tMin = t1;
            if (tMin > tMax)
                return false;

        }else{
            if(-e+aabb_min.y > 0.0f || -e+aabb_max.y < 0.0f)
                return false;
        }
    }


    // Test intersection with the 2 planes perpendicular to the OBB's Z axis
    // Exactly the same thing than above.
    {
        glm::vec3 zaxis(ModelMatrix[2].x, ModelMatrix[2].y, ModelMatrix[2].z);
        float e = glm::dot(zaxis, delta);
        float f = glm::dot(ray_direction, zaxis);

        if ( fabs(f) > 0.001f ){

            float t1 = (e+aabb_min.z)/f;
            float t2 = (e+aabb_max.z)/f;

            if (t1>t2){float w=t1;t1=t2;t2=w;}

            if ( t2 < tMax )
                tMax = t2;
            if ( t1 > tMin )
                tMin = t1;
            if (tMin > tMax)
                return false;

        }else{
            if(-e+aabb_min.z > 0.0f || -e+aabb_max.z < 0.0f)
                return false;
        }
    }

    intersection_distance = tMin;
    return true;

}
射线与碰撞盒的判定就结束了,虽然市面上的各个引擎都提供了接口,我们可以直接使用,但是如果我们能明白其原理,更有助于我们理解射线碰撞算法。