这几天1直在学习redis集群。然后准备用spring实现redis多机操作,不幸的是,遇到问题好几天都解决不了,1度想放弃,可是想一想,遇到困难正是学习提高的时候,就决定换种方式去实现多机操作。现在我把遇到问题贴出来:
application-context.xml
<beans xmlns="http://www.springframework.org/schema/beans"
xmlns:xsi="http://www.w3.org/2001/XMLSchema-instance"
xmlns:context="http://www.springframework.org/schema/context"
xsi:schemaLocation="http://www.springframework.org/schema/beans http://www.springframework.org/schema/beans/spring-beans.xsd" default-autowire="byName">
<!-- jedis 连接池配置-->
<bean id="jedisPoolConfig" class="redis.clients.jedis.JedisPoolConfig">
<property name="maxActive" value="${redis.pool.maxActive}" />
<property name="maxIdle" value="${redis.pool.maxIdle}" />
<property name="maxWait" value="${redis.pool.maxWait}" />
<property name="testOnBorrow" value="${redis.pool.testOnBorrow}" />
</bean>
<bean id="shardedJedisPool" class="redis.clients.jedis.ShardedJedisPool">
<constructor-arg index="0" ref="jedisPoolConfig"/>
<constructor-arg index="1">
<list>
<bean name="slaver" class="redis.clients.jedis.JedisShardInfo">
<constructor-arg index="0" value="redis.ip"/>
<constructor-arg index="1" value="${redis.port}" type="int"/>
</bean>
<bean name="master" class="redis.clients.jedis.JedisShardInfo">
<constructor-arg index="0" value="redis2.ip"/>
<constructor-arg index="1" value="${redis.port}" type="int"/>
</bean>
</list>
</constructor-arg>
</bean>
<!-- 引入properties配置文件 -->
<bean id="propertyConfigurer" class="org.springframework.beans.factory.config.PropertyPlaceholderConfigurer">
<property name="locations">
<list>
<value>classpath:*.properties</value>
<!--要是有多个配置文件,只需在这里继续添加便可 -->
</list>
</property>
</bean>
</beans>
db.properties(ps:由于家里电脑只安装1个redis服务,所以此处两个ip添1样,为方便测试不再开启第2个redis服务)
redis.ip=192.168.232.128
redis2.ip=192.168.232.128
#Port
redis.port=6379
#最大分配的对象数
redis.pool.maxActive=1024
#最大能够保持idel状态的对象数
redis.pool.maxIdle=200
#当池内没有返回对象时,最大等待时间
redis.pool.maxWait=1000
#当调用borrow Object方法时,是不是进行有效性检查
redis.pool.testOnBorrow=true
#当调用return Object方法时,是不是进行有效性检查
redis.pool.testOnReturn=true
测试代码:
import org.springframework.context.ApplicationContext;
import org.springframework.context.support.ClassPathXmlApplicationContext;
import redis.clients.jedis.ShardedJedis;
import redis.clients.jedis.ShardedJedisPool;
public class Test {
public static void main(String[] args) {
//resources/beans.xml
ShardedJedisPool shardedPool = null;
ApplicationContext context = new ClassPathXmlApplicationContext("classpath:Config.xml");
shardedPool = (ShardedJedisPool)context.getBean("shardedJedisPool");
ShardedJedis client = shardedPool.getResource();
try{
client.set("dddd", "sss");
System.out.println(client.get("dddd"));
}catch(Exception e){
e.printStackTrace();
}finally{
shardedPool.returnResource(client);//must be
}
}
}
<span style="font-size:14px;color:#ff0000;"><strong>测试结果:</strong></span>
<strong><span style="font-size:14px;color:#ff0000;"> </span></strong>
<strong><span style="font-size:14px;color:#ff0000;"> </span></strong>
<strong><span style="font-size:14px;color:#ff0000;"> <img src="http://img.blog.csdn.net/20160601002241745?watermark/2/text/aHR0cDovL2Jsb2cuY3Nkbi5uZXQv/font/5a6L5L2T/fontsize/400/fill/I0JBQkFCMA==/dissolve/70/gravity/Center" alt="" /></span></strong>
<strong><span style="font-size:14px;color:#ff0000;"> </span></strong>
<span style="font-size:14px;color:#ff0000;"><strong>关于这个毛病网上找了好久都没有找到甚么解决办法,但是我如果我把db.properties的配置直接写死在spring bean的属性里不会报错,以下:</strong></span>
<img src="http://img.blog.csdn.net/20160601002525692?watermark/2/text/aHR0cDovL2Jsb2cuY3Nkbi5uZXQv/font/5a6L5L2T/fontsize/400/fill/I0JBQkFCMA==/dissolve/70/gravity/Center" alt="" /> <span style="font-size:14px;color:#ff0000;"><strong> 测试不会报错:</strong></span>

我在网上找了很多spring整合redis集群的例子,发现都是用maven去构建的,难道我这样不用maven去获得db.properties就会有问题?哎,本人学识少,真的是很无奈啊。既然这样,我就准备尝试用maven去构建并实现spring并整合redis的集群。今天先把maven安装配置好。maven的安装配置网上很多资料,因我没用过maven,不过我就重复造轮子安装配置maven。
<span style="font-size:18px;color:#ff0000;">maven包下载地址:http://maven.apache.org/download.html</span>
<span style="font-size:14px;"><strong> 下载后解压到D:\maven\apache-maven⑶.3.9-bin,配置maven3的环境变量:先配置M2_HOME的环境变量,新建1个系统变量:M2_HOME , 路径是:D:\maven\apache-maven⑶.2.1,如图所示:</strong></span>
<strong><span style="font-size:14px;"></span></strong>
<strong><span style="font-size:14px;"> <img src="http://img.blog.csdn.net/20160601002956350?watermark/2/text/aHR0cDovL2Jsb2cuY3Nkbi5uZXQv/font/5a6L5L2T/fontsize/400/fill/I0JBQkFCMA==/dissolve/70/gravity/Center" alt="" /></span></strong>
<span style="font-size:14px;"><strong>再配置path环境变量,在path值的末尾添加"%M2_HOME%\bin",以下图所示;</strong></span>
<strong><span style="font-size:14px;"></span></strong>
<img src="http://img.blog.csdn.net/20160601003048366?watermark/2/text/aHR0cDovL2Jsb2cuY3Nkbi5uZXQv/font/5a6L5L2T/fontsize/400/fill/I0JBQkFCMA==/dissolve/70/gravity/Center" alt="" />
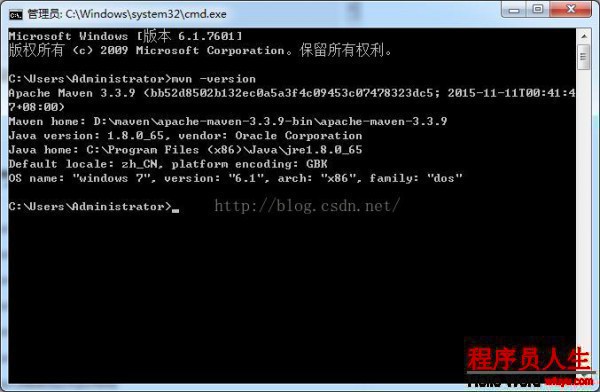
点击肯定以后,打开cmd窗口:输入mvn -version,出现以下内容表示安装成功。

Maven添加本地仓库:
打开本地寄存maven目录 例如:D:\maven\apache-maven⑶.3.9-bin\apache-maven⑶.3.9,打开conf文件夹下的settings.xml文件,找到第53行,把注释去掉,修改成:<localRepository>E:/mvnRespo</localRepository>
eclipse中的设置:
为Eclipse安装Maven插件(默许已有,无需安装)为Eclipse配置MAVEN
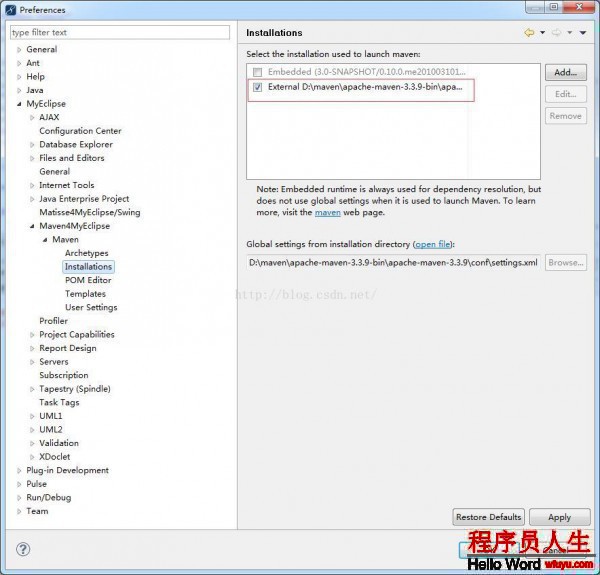
从Eclipse的菜单栏点击Windows-> Preferences -> Maven ->Installations,将之前解压的maven添加进来,如图所示

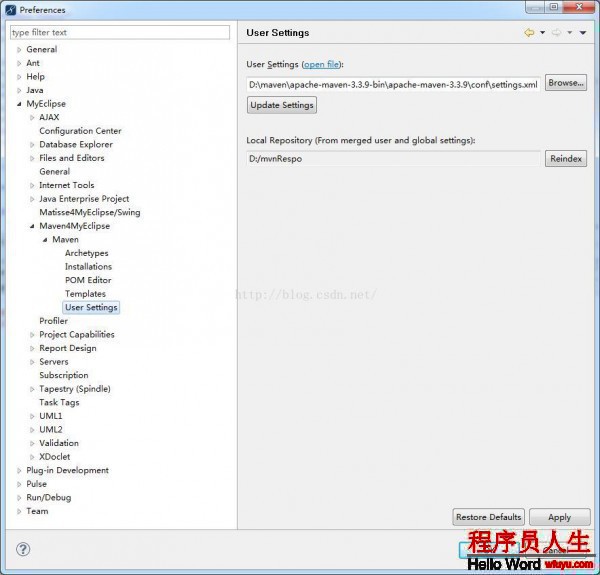
点击User Settings 使用我们自己的Maven配置,如图所示

至此,就能够建maven项目了

maven已搭建好了,等下次抽空用maven构建spring整合redis集群的例子,ok,睡觉!


