尊重原创转载请注明:From AigeStudio(http://blog.csdn.net/aigestudio)Power by Aige 侵权必究!
炮兵 镇楼
镇楼
要在数量上统计中国菜的品种,在地域上毫无争议地划分菜系,在今天,是1件几近不可能完成的事……Cut…… ……抱歉……忘吃药了,再来1遍。如果非要对自定义控件的流程进行1个简单的划分,我会尝试将其分为3大部份:控件的绘制、控件的丈量和控件的交互行动。前面我们用了6节的篇幅和1个翻页的例子来对控件的绘制有了1个全新的认识但是我们所做出的所有例子都是不完善的,为何这么说呢,还是先来看个sample:
/**
*
* @author AigeStudio {@link http://blog.csdn.net/aigestudio}
* @since 2015/1/12
*
*/
public class ImgView extends View {
private Bitmap mBitmap;// 位图对象
public ImgView(Context context, AttributeSet attrs) {
super(context, attrs);
}
@Override
protected void onDraw(Canvas canvas) {
// 绘制位图
canvas.drawBitmap(mBitmap, 0, 0, null);
}
/**
* 设置位图
*
* @param bitmap
* 位图对象
*/
public void setBitmap(Bitmap bitmap) {
this.mBitmap = bitmap;
}
}
这个例子呢非常简单,我们用它来摹拟类似ImageView的效果显示1张图片,在MainActivity中我们获得该控件并为其设置Bitmap:
/**
* 主界面
*
* @author Aige {@link http://blog.csdn.net/aigestudio}
* @since 2014/11/17
*/
public class MainActivity extends Activity {
private ImgView mImgView;
@Override
public void onCreate(Bundle savedInstanceState) {
super.onCreate(savedInstanceState);
setContentView(R.layout.activity_main);
mImgView = (ImgView) findViewById(R.id.main_pv);
Bitmap bitmap = BitmapFactory.decodeResource(getResources(), R.drawable.lovestory);
mImgView.setBitmap(bitmap);
}
}
此时运行效果以下:

很简单对吧,可是上面的代码实际上是有个问题的,至于甚么问题?我们待会再说,就看你通过前面我们的学习能不能发现了。这1节我们重点是控件的丈量,大家不知道注意没有,这个系列文章的命名我用了“控件”而非“View”其实目的就是说明我们的控件不但包括View也应当包括ViewGroup,固然你也能够以官方的方式将其分为控件和布局,不过我更喜欢View和ViewGroup,好了空话不说,我们先来看看View的丈量方式,上面的代码中MainActivity对应的布局文件以下:
<LinearLayout xmlns:android="http://schemas.android.com/apk/res/android"
android:layout_width="match_parent"
android:layout_height="match_parent"
android:background="#FFFFFFFF"
android:orientation="vertical" >
<com.aigestudio.customviewdemo.views.ImgView
android:id="@+id/main_pv"
android:layout_width="match_parent"
android:layout_height="match_parent" />
</LinearLayout>
既然我们的自定义View也算1个控件那末我们也能够像平时做布局那样往我们的LinearLayout中添加各种各样的其他控件对吧:
<LinearLayout xmlns:android="http://schemas.android.com/apk/res/android"
android:layout_width="match_parent"
android:layout_height="match_parent"
android:background="#FFFFFFFF"
android:orientation="vertical" >
<com.aigestudio.customviewdemo.views.ImgView
android:id="@+id/main_pv"
android:layout_width="match_parent"
android:layout_height="match_parent" />
<Button
android:layout_width="wrap_content"
android:layout_height="wrap_content"
android:text="AigeStudio" />
<TextView
android:layout_width="wrap_content"
android:layout_height="wrap_content"
android:text="AigeStudio" />
</LinearLayout>
但是运行后你却发现我们的Button和TextView却没有显示在屏幕上,这时候你可能会说那固然咯,由于我们的ImgViewlayout_width和layout_height均为match_parent,可是即使你将其改成wrap_content:
<LinearLayout xmlns:android="http://schemas.android.com/apk/res/android"
android:layout_width="match_parent"
android:layout_height="match_parent"
android:background="#FFFFFFFF"
android:orientation="vertical" >
<com.aigestudio.customviewdemo.views.ImgView
android:id="@+id/main_pv"
android:layout_width="wrap_content"
android:layout_height="wrap_content" />
<!-- ……省略1些代码…… -->
</LinearLayout>
结果也1样,这时候你肯定很困惑,不解的主要缘由是没有弄懂View的丈量机制,在前面的几节中我们或多或少有提到控件的丈量,也曾说过Android提供给我们能够操纵控件丈量的方法是onMeasure:
@Override
protected void onMeasure(int widthMeasureSpec, int heightMeasureSpec) {
super.onMeasure(widthMeasureSpec, heightMeasureSpec);
}
默许情况下onMeasure方法中只是简单地将签名列表中的两个int型参数回传给父类的onMeasure方法,然后由父类的方法去计算出终究的丈量值。但是,这里有个问题非常重要,就是onMeasure签名列表中的这两个参数是从何而来,这里可以告知大家的是,这两个参数是由view的父容器,代码中也就是我们的LinearLayout传递进来的,很多初学Android的朋友会将位于xml布局文件顶真个控件称之为根布局,比如这里我们的LinearLayout,而事实上在Android的GUI框架中,这个LinearLayout还称不上根布局,我们知道1个Activity可以对应1个View(也能够是ViewGroup),很多情况下我们会通过Activity的setContentView方法去设置我们的View:
@Override
public void onCreate(Bundle savedInstanceState) {
super.onCreate(savedInstanceState);
setContentView(R.layout.activity_main);
}
setContentView在Activity内的实现也非常简单,就是调用getWindow方法获得1个Window类型的对象并调用其setContentView方法:
public void setContentView(int layoutResID) {
getWindow().setContentView(layoutResID);
initActionBar();
}
而这个Window对象
public Window getWindow() {
return mWindow;
}
其本质也就是1个PhoneWindow,在Activity的attach方法中通过makeNewWindow生成:
final void attach(Context context, ActivityThread aThread,
// 此处省去1些代码……
mWindow = PolicyManager.makeNewWindow(this);
mWindow.setCallback(this);
mWindow.getLayoutInflater().setPrivateFactory(this);
if (info.softInputMode != WindowManager.LayoutParams.SOFT_INPUT_STATE_UNSPECIFIED) {
mWindow.setSoftInputMode(info.softInputMode);
}
if (info.uiOptions != 0) {
mWindow.setUiOptions(info.uiOptions);
}
// 此处省去巨量代码……
}
在PolicyManager中通过反射的方式获得com.android.internal.policy.impl.Policy的1个实例:
public final class PolicyManager {
private static final String POLICY_IMPL_CLASS_NAME =
"com.android.internal.policy.impl.Policy";
private static final IPolicy sPolicy;
static {
try {
Class policyClass = Class.forName(POLICY_IMPL_CLASS_NAME);
sPolicy = (IPolicy)policyClass.newInstance();
} catch (ClassNotFoundException ex) {
throw new RuntimeException(
POLICY_IMPL_CLASS_NAME + " could not be loaded", ex);
} catch (InstantiationException ex) {
throw new RuntimeException(
POLICY_IMPL_CLASS_NAME + " could not be instantiated", ex);
} catch (IllegalAccessException ex) {
throw new RuntimeException(
POLICY_IMPL_CLASS_NAME + " could not be instantiated", ex);
}
}
// 省去构造方法……
public static Window makeNewWindow(Context context) {
return sPolicy.makeNewWindow(context);
}
// 省去无关代码……
}
并通过其内部的makeNewWindow实现返回1个PhoneWindow对象:
public Window makeNewWindow(Context context) {
return new PhoneWindow(context);
}
PhoneWindow是Window的1个子类,其对Window中定义的大量抽象方法作了具体的实现,比如我们的setContentView方法在Window中仅做了1个抽象方法定义:
public abstract class Window {
// 省去不可估计的代码……
public abstract void setContentView(int layoutResID);
public abstract void setContentView(View view);
public abstract void setContentView(View view, ViewGroup.LayoutParams params);
// 省去数以亿计的代码……
}
其在PhoneWindow中都有具体的实现:
public class PhoneWindow extends Window implements MenuBuilder.Callback {
// 省去草泥马个代码……
@Override
public void setContentView(int layoutResID) {
if (mContentParent == null) {
installDecor();
} else {
mContentParent.removeAllViews();
}
mLayoutInflater.inflate(layoutResID, mContentParent);
final Callback cb = getCallback();
if (cb != null && !isDestroyed()) {
cb.onContentChanged();
}
}
@Override
public void setContentView(View view) {
setContentView(view, new ViewGroup.LayoutParams(MATCH_PARENT, MATCH_PARENT));
}
@Override
public void setContentView(View view, ViewGroup.LayoutParams params) {
if (mContentParent == null) {
installDecor();
} else {
mContentParent.removeAllViews();
}
mContentParent.addView(view, params);
final Callback cb = getCallback();
if (cb != null && !isDestroyed()) {
cb.onContentChanged();
}
}
// 省去法克鱿个代码……
}
固然如果你要是使用了TV的SDK那末这里就不是PhoneWindow而是TVWindow了,至因而不是呢?留给大家去验证。到这里我们都还没完,在PhoneWindow的setContentView方法中先会去判断mContentParent这个援用是不是为空,如果为空则表示我们是第1次生成那末调用installDecor方法去生成1些具体的对象否则清空该mContentParent下的所有子元素(注意mContentParent是1个ViewGroup)并通过LayoutInflater将xml布局转换为View
Tree添加至mContentParent中(这里根据setContentView(int layoutResID)方法分析,其他重载方法类似),installDecor方法做的事相对多但不复杂,首先是对DecorView类型的mDecor成员变量赋值继而将其注入generateLayout方法生成我们的mContentParent:
private void installDecor() {
if (mDecor == null) {
mDecor = generateDecor();
// 省省省……
}
if (mContentParent == null) {
mContentParent = generateLayout(mDecor);
// 省省省……
}
// 省省省……
}
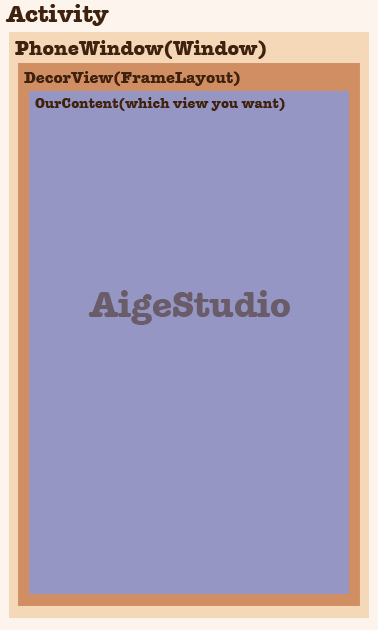
generateLayout方法中做的事就多了,简直可以跟performTraversals拼,这里不贴代码了简单分析1下,generateLayout方法中主要根据当前我们的Style类型为当前Window选择不同的布局文件,看到这里,想必大家也该意想到,这才是我们的“根布局”,其会指定1个用来寄存我们自定义布局文件(也就是我们口头上常说的根布局比如我们例子中的LinearLayout)的ViewGroup,1般情况下这个ViewGroup的重担由FrameLayout来承当,这也是为何我们在获得我们xml布局文件中的顶层布局时调用其getParent()方法会返回FrameLayout对象的缘由,其id为android:id="@android:id/content":
protected ViewGroup generateLayout(DecorView decor) {
// 省去巨量代码……
ViewGroup contentParent = (ViewGroup)findViewById(ID_ANDROID_CONTENT);
// 省去1些代码……
}
在这个Window布局文件被肯定后,mDecor则会将该布局所生成的对应View添加进来并获得id为content的View将其赋给mContentParent,至此mContentParent和mDecor均已生成,而我们xml布局文件中的布局则会被添加至mContentParent。对应关系类似下图:

说了大半天才理清这个小关系,但是我们还没说到重点…………………………就是widthMeasureSpec和heightMeasureSpec究竟是从哪来的……………………如果我们不做上面的1个分析,很多童鞋压根无从下手,有了上面1个分析,我们知道我们界面的真正根视图应当是DecorView,那末我们的widthMeasureSpec和heightMeasureSpec应当从这里或更上1层PhoneWindow传递进来对吧,但是DecorView是FrameLayout的1个实例,在FrameLayout的onMeasure中我们确切有对子元素的丈量,但是问题是FrameLayout:onMeasure方法中的widthMeasureSpec和heightMeasureSpec又是从何而来呢?追溯上去我们又回到了View…………………………………………………………不了解Android
GUI框架的童鞋迈出的第1步就被无情地煽了回去。其实在Android中我们可以在很多方面看到类似MVC架构的影子,比如最最多见的就是我们的xml界面布局――Activity等组件――model数据之间的关系,而在全部GUI的框架中,我们也能够对其做出类似的计划,View在设计进程中就注定了其只会对显示数据进行处理比如我们的丈量布局和绘制还有动画等等,而承当Controller控制器重担的是谁呢?在Android中这1功能由ViewRootImpl承当,我们在前面提到过这个类,其负责的东西很多,比如我们窗口的显示、用户的输入输出固然还有关于处理我们绘制流程的方法:
private void performTraversals() {
// ………………啦啦啦啦………………
}
performTraversals方法是处理绘制流程的1个开始,内部逻辑相当相当多&复杂,虽然没有View类复杂……但是让我选的话我宁愿看全部View类也不愿看performTraversals方法那邪恶的逻辑…………
 镇楼
镇楼 ……抱歉……忘吃药了,再来1遍。如果非要对自定义控件的流程进行1个简单的划分,我会尝试将其分为3大部份:控件的绘制、控件的丈量和控件的交互行动。前面我们用了6节的篇幅和1个翻页的例子来对控件的绘制有了1个全新的认识但是我们所做出的所有例子都是不完善的,为何这么说呢,还是先来看个sample:
