说说PendingIntent的内部机制
说说PendingIntent的内部机制
侯 亮
1 概述
在Android中,我们常常使用PendingIntent来表达1种“留待往后处理”的意思。从这个角度来讲,PendingIntent可以被理解为1种特殊的异步处理机制。不过,单就命名而言,PendingIntent其实具有1定误导性,由于它既不继承于Intent,也不包括Intent,它的核心可以粗略地汇总成4个字――“异步激起”。
很明显,这类异步激起常常是要跨进程履行的。比如说A进程作为发起端,它可以从系统“获得”1个PendingIntent,然后A进程可以将PendingIntent对象通过binder机制“传递”给B进程,再由B进程在未来某个适合时机,“回调”PendingIntent对象的send()动作,完成激起。
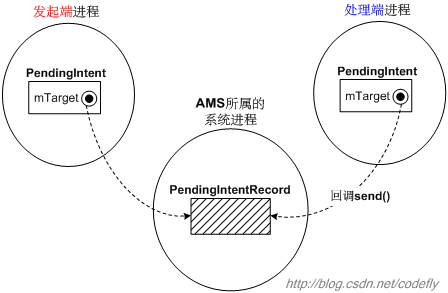
在Android系统中,最合适做集中性管理的组件就是AMS(Activity Manager Service)啦,所以它当仁不让地承当起管理所有PendingIntent的职责。这样我们就能够画出以下示意图:

注意其中的第4步“递送相应的intent”。这1步递送的intent是从何而来的呢?简单地说,当发起端获得PendingIntent时,实际上是需要同时提供若干intent的。这些intent和PendingIntent只是配套的关系,而不是聚合的关系,它们会被缓存在AMS中。往后,1旦处理端将PendingIntent的“激起”语义传递到AMS,AMS就会尝试找到与这个PendingIntent对应的若干intent,并递送出去。
固然,以上说的只是大概情况,实际的技术细节会更复杂1点儿。下面我们就来谈谈细节。
2 PendingIntent的技术细节
2.1 发起端获得PendingIntent
我们先要理解,所谓的“发起端获得PendingIntent”到底指的是甚么。难道只是简单new1个PendingIntent对象吗?固然不是。此处的“获得”动作其实还含有向AMS“注册”intent的语义。
在PendingIntent.java文件中,我们可以看到有以下几个比较常见的静态函数:
- public static PendingIntent getActivity(Context context, int requestCode, Intent intent, int flags)
- public static PendingIntent getBroadcast(Context context, int requestCode, Intent intent, int flags)
- public static PendingIntent getService(Context context, int requestCode, Intent intent, int flags)
- public static PendingIntent getActivities(Context context, int requestCode, Intent[] intents, int flags)
- public static PendingIntent getActivities(Context context, int requestCode, Intent[] intents, int flags, Bundle options)
它们就是我们经常使用的获得PendingIntent的动作了。
坦白说,这几个函数的命名可真不怎样样,所以我们简单解释1下。上面的getActivity()的意思实际上是,获得1个PendingIntent对象,而且该对象往后激起时所做的事情是启动1个新activity。也就是说,当它异步激起时,会履行类似Context.startActivity()那样的动作。相应地,getBroadcast()和getService()所获得的PendingIntent对象在激起时,会分别履行类似Context..sendBroadcast()和Context.startService()这样的动作。至于最后两个getActivities(),用得比较少,激起时可以启动几个activity。
我们以getActivity()的代码来讲明问题:
其中那句new PendingIntent(target)创建了PendingIntent对象,其重要性自不待言。但是,这个对象的内部核心实际上是由上面那个getIntentSender()函数得来的。而这个IIntentSender核心才是我们真正需要关心的东西。
说穿了,此处的IIntentSender对象是个binder代理,它对应的binder实体是AMS中的PendingIntentRecord对象。PendingIntent对象构造之时,IIntentSender代理作为参数传进来,并记录在PendingIntent的mTarget域。往后,当PendingIntent履行异步激起时,其内部就是靠这个mTarget域向AMS传递语义的。
我们前文说过,PendingIntent常常会经过binder机制,传递到另外一个进程去。而binder机制可以保证,目标进程得到的PendingIntent的mTarget域也是合法的IIntentSender代理,而且和发起真个IIntentSender代理对应着同1个PendingIntentRecord实体。示意图以下:

2.2 AMS里的PendingIntentRecord
那末PendingIntentRecord里又有甚么信息呢?它的定义截选以下:
请注意其中那个key域。这里的Key是个PendingIntentRecord的内嵌类,其定义截选以下:
请注意其中的allIntents[]数组域和requestIntent域。前者记录了当初获得PendingIntent时,用户所指定的所有intent(虽然1般情况下只会指定1个intent,但类似getActivities()这样的函数还是可以指定多个intent的),而后者可以粗浅地理解为用户所指定的那个intent数组中的最后1个intent。现在大家应当清楚异步激起时用到的intent都存在哪里了吧。
Key的构造函数截选以下:
Key不光承当着记录信息的作用,它还承当“键值”的作用。
2.3 AMS中的PendingIntentRecord总表
在AMS中,管理着系统中所有的PendingIntentRecord节点,所以需要把这些节点组织成1张表:
这张哈希映照表的键值类型就是刚才所说的PendingIntentRecord.Key。
以后每当我们要获得PendingIntent对象时,PendingIntent里的mTarget是这样得到的:AMS会先查mIntentSenderRecords表,如果能找到符合的PendingIntentRecord节点,则返回之。如果找不到,就创建1个新的PendingIntentRecord节点。由于PendingIntentRecord是个binder实体,所以经过binder机制传递后,客户进程拿到的就是个合法的binder代理。如此1来,前文的示意图可以进1步修改成下图:
2.4 AMS里的getIntentSender()函数
现在,我们回过头继续说前文的getActivity(),和其调用的getIntentSender()。我们先列1遍getActivity()的原型:
- context参数是调用方的上下文。
- requestCode是个简单的整数,起辨别作用。
- intent是异步激起时将发出的intent。
- flags可以包括1些既有的标识,比如FLAG_ONE_SHOT、FLAG_NO_CREATE、FLAG_CANCEL_CURRENT、FLAG_UPDATE_CURRENT等等。很多同学对这个域不是很清楚,我们后文会细说。
- options可以携带1些额外的数据。
getActivity()的代码很简单,其参数基本上都传给了getIntentSender()。
getIntentSender()的原型大体是这样的:
其参数比getActivity()要多1些,我们逐一说明。
type参数表明PendingIntent的类型。getActivity()和getActivities()动作里指定的类型值是INTENT_SENDER_ACTIVITY,getBroadcast()和getService()和动作里指定的类型值分别是INTENT_SENDER_BROADCAST和INTENT_SENDER_SERVICE。另外,在Activity.java文件中,我们还看到1个createPendingResult()函数,这个函数表达了发起方的activity往后希望得到result回馈的意思,所以其内部调用getIntentSender()时指定的类型值为INTENT_SENDER_ACTIVITY_RESULT。
packageName参数表示发起端所属的包名。
token参数是个指代回馈目标方的代理。这是甚么意思呢?我们经常使用的getActivity()、getBroadcast()和getService()中,只是把这个参数简单地指定为null,表示这个PendingIntent激起时,是不需要发回甚么回馈的。不过当我们希望获得类型为INTENT_SENDER_ACTIVITY_RESULT的PendingIntent时,就需要指定token参数了。具体可参考createPendingResult()的代码:
看到了吗?传入的token为Activity的mToken或其mParent.mToken。说得简单点儿,AMS内部可以根据这个token找到其对应的ActivityRecord,往后当PendingIntent激起时,AMS可以根据这个ActivityRecord肯定出该向哪一个目标进程的哪一个Activity发出result语义。
resultWho参数和token参数息息相干,1般也是null啦。在createPendingResult()中,其值为Activity的mEmbeddedID字符串。
requestCode参数是个简单的整数,可以在获得PendingIntent时由用户指定,它可以起辨别的作用。
intents数组参数是异步激起时希望发出的intent。对getActivity()、getBroadcast()和getService()来讲,都只会指定1个intent而已。只有getActivities()会尝试1次传入若干intent。
resolvedTypes参数基本上和intent是相干的。1般是这样得到的:
这个值常常和intent内部的mData URI有关系,比如终究的值多是URI对应的MIME类型。
flags参数可以指定PendingIntent的1些行动特点。它的取值是1些既有的比特标识的组合。目前可用的标识有:FLAG_ONE_SHOT、FLAG_NO_CREATE、FLAG_CANCEL_CURRENT、FLAG_UPDATE_CURRENT等等。有时候,flags中还可以附带若干FILL_IN_XXX标识。我们把常见的标识定义罗列以下:
【PendingIntent中】
【Intent中】
这些以FILL_IN_打头的标志位,主要是在intent对象的fillIn()函数里起作用:
我们以FILL_IN_ACTION为例来讲明,当我们履行类似srcIntent.fillIn(otherIntent, ...)的句子时,如果otherIntent的mAction域不是null值,那末fillIn()会在以下两种情况下,用otherIntent的mAction域值为srcIntent的mAction域赋值:
1) 当srcIntent的mAction域值为null时;
2) 如果fillIn的flags参数里携带了FILL_IN_ACTION标志位,那末即使srcIntent的mAction已有值了,此时也会用otherIntent的mAction域值强行替换掉srcIntent的mAction域值。
其他FILL_IN_标志位和FILL_IN_ACTION的处理方式类似,我们不再赘述。
options参数可以携带1些额外数据。
2.4.1 getIntentSender()函数
getIntentSender()函数摘录以下:
getIntentSender()函数中有1段逐条判断intents[]的代码,我用伪代码checkIntents(intents)来表示,这部份对应的实际代码以下:
这段代码说明在获得PendingIntent对象时,intent中是不能携带文件描写符的。而且如果这个PendingIntent是那种要发出广播的PendingIntent,那末intent中也不能携带FLAG_RECEIVER_BOOT_UPGRADE标识符。“BOOT_UPGRADE”应当是“启动并升级”的意思,它不能使用PendingIntent。
getIntentSender()中最核心的1句应当是调用getIntentSenderLocked()的那句。
2.4.2 getIntentSenderLocked()函数
getIntentSenderLocked()的代码截选以下:
【frameworks/base/services/java/com/android/server/am/ActivityManagerService.java】
上面这段代码主要做的事情有:
1) 将传进来的多个参数信息整理成1个PendingIntentRecord.Key对象(key);
2) 尝试从mIntentSenderRecords总表中查找和key符合的PendingIntentRecord节点;
3) 根据flags参数所含有的意义,对得到的PendingIntentRecord进行加工。有时候修改之,有时候删除之。
4) 如果在总表中没有找到对应的PendingIntentRecord节点,或根据flags的语义删除刚找到的节点,那末此时的默许行动是创建1个新的PendingIntentRecord节点,并插入总表。除非flags中明确指定了FLAG_NO_CREATE,此时不会创建新节点。
2.4.3 说说flags
从getIntentSenderLocked()的代码中,我们终究弄明白了flags中那些特定比特值的意义了。我们现在总结1下。
应当说这些flags比特值基本上都是在围绕着mIntentSenderRecords总表说事的。其中,FLAG_CANCEL_CURRENT的意思是,当我们获得PendingIntent时,如果可以从总表中查到1个符合的已存在的PendingIntentRecord节点的话,那末需要把这个节点从总表中清算出去。而在没有指定FLAG_CANCEL_CURRENT的大条件下,如果用户指定了FLAG_UPDATE_CURRENT标识,那末会用新的intents参数替掉刚查到的PendingIntentRecord中的旧intents。
而不论是刚清算了已存在的PendingIntentRecord,还是压根儿就没有找到符合的PendingIntentRecord,只要用户没有明确指定FLAG_NO_CREATE标识,系统就会尽力创建1个新的PendingIntentRecord节点,并插入总表。
至于FLAG_ONE_SHOT标识嘛,它并没有在getIntentSenderLocked()中露脸儿。它的名字是“FLAG_ONE_SHOT”,也就是“只打1枪”的意思,那末很明显,这个标识起作用的地方应当是在“激起”函数里。在终究的激起函数(sendInner())里,我们可以看到下面的代码:
【frameworks/base/services/java/com/android/server/am/PendingIntentRecord.java】
意思很简单,1进行激起就把相应的PendingIntentRecord节点从总表中清算出去,而且把PendingIntentRecord的canceled域设为true。这样,以后即使外界再调用send()动作都没用了,由于再也没法进入if (!canceled)判断了。
2.4.4 将PendingIntentRecord节点插入总表
接下来getIntentSenderLocked()函数new了1个PendingIntentRecord节点,并将之插入mIntentSenderRecords总表中。
2.5 PendingIntent的激起动作
下面我们来看PendingIntent的激起动作。在前文我们已说过,当需要激起PendingIntent之时,主要是通过调用PendingIntent的send()函数来完成激起动作的。PendingIntent提供了多个情势的send()函数,但是这些函数的内部其实调用的是同1个send(),其函数原型以下:
该函数内部最关键的1句是:
我们前文已介绍过这个mTarget域了,它对应着AMS中的某个PendingIntentRecord。
所以我们要看1下PendingIntentRecord1侧的send()函数,其代码以下:
其中sendInner()才是真正做激起动作的函数。
sendInner()完成的主要逻辑动作有:
1) 如果当前PendingIntentRecord节点已处于canceled域为true的状态,那末说明这个节点已被取消掉了,此时sendInner()不会做任何实质上的激起动作,只是简单地return ActivityManager.START_CANCELED而已。
2) 如果当初在创建这个节点时,使用者已指定了FLAG_ONE_SHOT标志位的话,那末此时sendInner()会把这个PendingIntentRecord节点从AMS中的总表中摘除,并且把canceled域设为true。而后的操作和普通激起时的动作是1致的,也就是说也会走下面的第3)步。
3) 关于普通激起时应履行的逻辑动作是,根据当初创建PendingIntentRecord节点时,用户指定的type类型,进行不同的处理。这个type其实就是我们前文所说的INTENT_SENDER_ACTIVITY、INTENT_SENDER_BROADCAST、INTENT_SENDER_SERVICE等类型啦,大家如有兴趣,可自己参考本文1开始所说的getActivity()、getBroadcast()、getService()等函数的实现代码。
现在还有1个问题是,既然我们在当初获得PendingIntent时,已指定了往后激起时需要递送的intent(或intent数组),那末为何send()动作里还有1个intent参数呢?它们的关系又是甚么呢?我料想,PendingIntent机制的设计者是希望给激起端1个修改“待激起的intent”的机会。比如当初我们获得PendingIntent对象时,如果在flags里设置了FILL_IN_ACTION标志位,那末就说明我们允许往后在某个激起点,用新的intent的mAction域值,替换掉我们最初给的intent的mAction域值。如果1开始没有设置FILL_IN_ACTION标志位,而且在最初的intent里已有了非空的mAction域值的话,那末即便在激起端又传入了新intent,它也不可能修改用新intent的mAction域值替换旧intent的mAction域值。
仔细的读者1定记得,当初获得PendingIntent对象时,我们可是向AMS端传递了1个intent数组噢,虽然1般情况下这个数组里只有1个intent元素,但有时候我们也是有可能1次性传递多个intent的。比如getActivities()函数就能够1次传递多个intent。可是现在激起动作send()却只能传递1个intent参数,这该如何处理呢?答案很简单,所传入的intent只能影响已有的intent数组的最后1个intent元素。大家可以看看sendInner里allIntents[allIntents.length⑴] = finalIntent;1句。
下一篇 BPMN规范中的三种视图
