写在前面
熟习Unity的都知道,Unity可以进行基本的雾效摹拟。所谓雾效,就是在阔别我们视角的方向上,物体看起来像被蒙上了某种色彩(通常是灰色)。这类技术的实现实际上非常简单,就是根据物体距离摄像机的远近,来混合雾的色彩和物体本身的色彩便可。
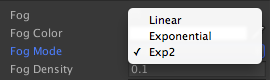
Unity里设置雾效有两种方式,1种最简单的就是直接开启全局雾效,也就是在Edit->Render Settings里配置,以下图所示:

而我们只需要把“Fog”选项后面的勾选框打开便可。上图包括了1些设置:雾的色彩,摹拟雾采取的方法,雾的浓度(只在采取指数方法时有用),受雾影响的距离出发点和终点(只在采取线性方法时有效)。其中,比较重要的是摹拟雾采取的方法,即“Fog Mode”这1选项。它可以选择3种方法:
还有1种方法就是在shader中用Fog指令设置。这里有官网的说明。
3种模式
Linear、Exponential和Exp2这3种模式实际上是使用了不同的公式计算雾的影响因子。这个影响因子会作为混合雾的色彩和物体原始色彩的参数,来计算终究的混合色彩。例如,我们使用下面的语句来计算:
float3 afterFog = mix(_FogColor.rgb, col.rgb, fogFactor);
如果影响因子为1,则表明完全没有雾效;如果为0,则表示完全被雾覆盖。而3种模式使用的公式分别以下所示:
- Linear:
 ,其中Dmax和Dmin分别表示受雾影响的距离出发点和终点。
- Exponential:
 ,其中d表示雾的浓度。
- Exp2:
 ,其中d表示雾的浓度。
3个等式中的z,表示距离摄像机的远近。
为了充分理解雾效的实现原理和这3种方法的不同的地方,我们这篇会自己在Fragment Shader中摹拟雾效。
Unity摹拟的雾效
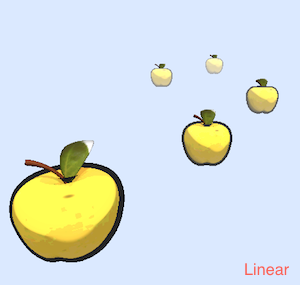
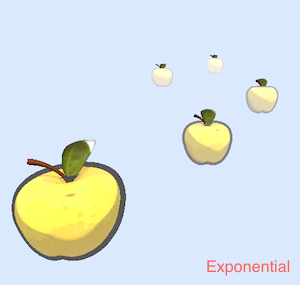
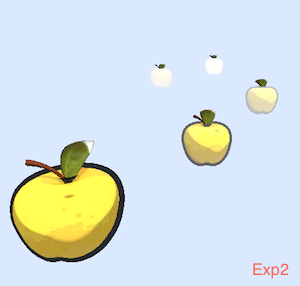
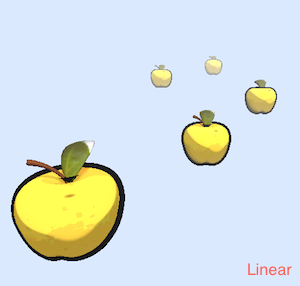
我们采取以下简单的卡通苹果场景(小苹果真是我的最爱。。。)来检验雾效。原始的场景如图所示:
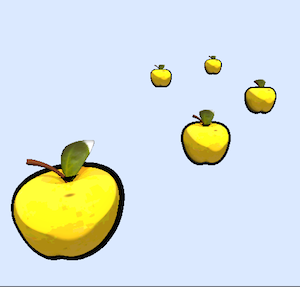
其中距离相机最远的小苹果的距离大约是25单位。
我们开启Unity的全局雾效后,分别采取3种方法摹拟,结果以下:


它们的雾效配置以下所示:
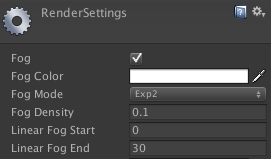
我们在后面会解释这些参数的含义,现在我们只需要知道“Fog Density”仅在“Fog Mode”为“Exponential”或“Exp2”时有用,而“Linear Fog Start”和“Linear Fog End”仅在“Fog Mode”为“Linear”时有用便可。注意,上面的“Linear Fog Start”和“Linear Fog End”参数是基于“距离相机最远的小苹果的距离大约是25单位”这1条件设置的,只是为了让雾效更加明显而已。
现在,我们可以从视觉上了解3种方法的异同。
Fog实现的内部原理
为了充分了解雾效算法,我们现在在小苹果现有的shader里添加雾效算法的实现。
- 首先,我们需要在Properties块中添加雾效的几个设置参数:
Properties {
_MainTex ("Base (RGB)", 2D) = "white" {}
_Ramp ("Ramp Texture", 2D) = "white" {}
_Tooniness ("Tooniness", Range(0.1,20)) = 4
_Outline ("Outline", Range(0,1)) = 0.1
_FogColor("Fog Color", Color) = (1, 0, 0, 0)
_FogIntensity("Fog Intensity", float) = 0.1
_FogStart("Fog Start", float) = 0
_FogEnd("Fog End", float) = 300
}
- 下面是添加摹拟雾效的函数:
float4 SimulateFog(float4 pos, float4 col)
{
pos.w = 0.0;
float dist = length(pos);
// float dist = pos.z;
// Linear
// float fogFactor = (_FogEnd - abs(dist)) / (_FogEnd - _FogStart);
// fogFactor = clamp(fogFactor, 0.0, 1.0);
// Exponential
// float fogFactor = exp(-abs(_FogIntensity * dist));
// fogFactor = clamp(fogFactor, 0.0, 1.0);
// Exp2
float fogFactor = exp(-(_FogIntensity * dist) * (_FogIntensity * dist));
fogFactor = clamp(fogFactor, 0.0, 1.0);
float3 afterFog = mix(_FogColor.rgb, col.rgb, fogFactor);
return float4(afterFog, col.a);
}
解释:有了上面的公式,这个函数很好理解。值得说明的是,函数参数pos是指在view space中顶点的位置,由于只有在这个坐标系中,摄像机的位置总是位于原点。在计算距离摄像机远近时,我们有两种可选方式:1种直接使用pos.z得到近似值,1种是使用真正距离摄像机的距离,即计算xyz平方和后开根号的结果。第2种方法由于使用了计算根号这类操作,因此在性能上稍微比第1种查1点,但效果也更真实。
使用上述代码的3种模式效果以下:
上图中使用苹果主体部份使用了fog shader,叶子和梗没有使用哦~可以看出,和Unity摹拟的效果基本相同。
最后,完全的代码以下:
Shader "Custom/FogSimulation" {
Properties {
_MainTex ("Base (RGB)", 2D) = "white" {}
_Ramp ("Ramp Texture", 2D) = "white" {}
_Tooniness ("Tooniness", Range(0.1,20)) = 4
_Outline ("Outline", Range(0,1)) = 0.1
_FogColor("Fog Color", Color) = (1, 0, 0, 0)
_FogIntensity("Fog Intensity", float) = 0.1
_FogStart("Fog Start", float) = 0
_FogEnd("Fog End", float) = 300
}
SubShader {
Tags { "RenderType"="Opaque" }
LOD 200
CGINCLUDE
#include "UnityCG.cginc"
sampler2D _MainTex;
sampler2D _Ramp;
float4 _MainTex_ST;
float _Tooniness;
float _Outline;
float4 _FogColor;
float _FogIntensity;
float _FogStart;
float _FogEnd;
float4 SimulateFog(float4 pos, float4 col)
{
pos.w = 0.0;
float dist = length(pos);
// float dist = pos.z;
// Linear
// float fogFactor = (_FogEnd - abs(dist)) / (_FogEnd - _FogStart);
// fogFactor = clamp(fogFactor, 0.0, 1.0);
// Exponential
// float fogFactor = exp(-abs(_FogIntensity * dist));
// fogFactor = clamp(fogFactor, 0.0, 1.0);
// Exp2
float fogFactor = exp(-(_FogIntensity * dist) * (_FogIntensity * dist));
fogFactor = clamp(fogFactor, 0.0, 1.0);
float3 afterFog = mix(_FogColor.rgb, col.rgb, fogFactor);
return float4(afterFog, col.a);
}
ENDCG
Pass {
Tags { "LightMode"="ForwardBase" }
Cull Front
Lighting Off
ZWrite On
CGPROGRAM
#pragma vertex vert
#pragma fragment frag
#pragma multi_compile_fwdbase
#include "UnityCG.cginc"
struct a2v
{
float4 vertex : POSITION;
float3 normal : NORMAL;
};
struct v2f
{
float4 pos : POSITION;
float4 viewSpacePos : TEXCOORD0;
};
v2f vert (a2v v)
{
v2f o;
float4 pos = mul( UNITY_MATRIX_MV, v.vertex);
float3 normal = mul( (float3x3)UNITY_MATRIX_IT_MV, v.normal);
normal.z = -0.5;
pos = pos + float4(normalize(normal),0) * _Outline;
o.pos = mul(UNITY_MATRIX_P, pos);
o.viewSpacePos = mul( UNITY_MATRIX_MV, v.vertex);
return o;
}
float4 frag(v2f i) : COLOR
{
return SimulateFog(i.viewSpacePos, float4(0, 0, 0, 1));
}
ENDCG
}
Pass {
Tags { "LightMode"="ForwardBase" }
Cull Back
Lighting On
CGPROGRAM
#pragma vertex vert
#pragma fragment frag
#pragma multi_compile_fwdbase
#include "UnityCG.cginc"
#include "Lighting.cginc"
#include "AutoLight.cginc"
#include "UnityShaderVariables.cginc"
struct a2v
{
float4 vertex : POSITION;
float3 normal : NORMAL;
float4 texcoord : TEXCOORD0;
float4 tangent : TANGENT;
};
struct v2f
{
float4 pos : POSITION;
float2 uv : TEXCOORD0;
float3 normal : TEXCOORD1;
float4 viewSpacePos : TEXCOORD2;
LIGHTING_COORDS(3,4)
};
v2f vert (a2v v)
{
v2f o;
//Transform the vertex to projection space
o.pos = mul( UNITY_MATRIX_MVP, v.vertex);
o.normal = mul((float3x3)_Object2World, SCALED_NORMAL);
//Get the UV coordinates
o.uv = TRANSFORM_TEX (v.texcoord, _MainTex);
o.viewSpacePos = mul( UNITY_MATRIX_MV, v.vertex);
// pass lighting information to pixel shader
TRANSFER_VERTEX_TO_FRAGMENT(o);
return o;
}
float4 frag(v2f i) : COLOR
{
//Get the color of the pixel from the texture
float4 c = tex2D (_MainTex, i.uv);
//Merge the colours
c.rgb = (floor(c.rgb*_Tooniness)/_Tooniness);
//Based on the ambient light
float3 lightColor = UNITY_LIGHTMODEL_AMBIENT.xyz;
//Work out this distance of the light
float atten = LIGHT_ATTENUATION(i);
//Angle to the light
float diff = dot (normalize(i.normal), normalize(_WorldSpaceLightPos0.xyz));
diff = diff * 0.5 + 0.5;
//Perform our toon light mapping
diff = tex2D(_Ramp, float2(diff, 0.5));
//Update the colour
lightColor += _LightColor0.rgb * (diff * atten);
//Product the final color
c.rgb = lightColor * c.rgb * 2;
return SimulateFog(i.viewSpacePos, c);
}
ENDCG
}
}
FallBack "Diffuse"
}
写在最后
Unity文档中写道:
Note that if you use fragment programs, Fog settings of the shader will still be applied. On platforms where there is no fixed function Fog functionality, Unity will patch shaders at runtime to support the requested Fog mode.
也就是说,即使我们是使用自己编写的Fragment Shader,但还是会遭到Unity Render Settings的影响。即使是Unity里自定义的Vertex & Fragment Shader,应当也是不知道被Unity封装了多少层以后的上层函数。如果开启了全局雾效,那末Unity会在背后大概使用了固定渲染流水线中的fog指令,来摹拟雾效。因此,如果对不支持固定管线的雾效函数的平台,它就会使用自己编写shader(类似我们上面那样),来摹拟雾效。
参考:《OpenGL 4 Sharding Language Cookbook》