一步一步用jenkins,ansible,supervisor打造一个web构建发布系统
新blog地址:http://hengyunabc.github.io/deploy-system-build-with-jenkins-ansible-supervisor/
1步1步用jenkins,ansible,supervisor打造1个web构建发布系统。
本来应当还有gitlab这1环节的,但是感觉加上,内容会增加很多。所以直接用github上的spring-mvc-showcase项目来做演示。
https://github.com/spring-projects/spring-mvc-showcase
本文的环境用docker来构建。固然也能够任意linux环境下搭建。
如果没有安装docker,可以参考官方的文档:
https://docs.docker.com/installation/ubuntulinux/#ubuntu-trusty⑴404-lts⑹4-bit
下面将要介绍的完全流程是:
- github作为源代码仓库
在文章的最后,会给出1个完全的docker镜像,大家可以自己运行查看实际效果。
安装jenkins
- 先用docker来启动1个名为“jenkins”的容器:
sudo docker run -i -t -p 8080:8080 -p 8101:8101 -p 9001:9001 --name='jenkins' ubuntu /bin/bash8080是jenkins的端口,8101是spring-mvc-showcase的端口,9001是supervisor的web界面端口
履行完以后,会得到1个container的shell。接着在这个shell里安装其它组件。
- 安装open jdk 和 git:
sudo apt-get update
sudo apt-get install openjdk-7-jdk git- 下载配置tomcat:
apt-get install wget
mkdir /opt/jenkins
cd /opt/jenkins
wget http://apache.fayea.com/tomcat/tomcat-8/v8.0.18/bin/apache-tomcat-8.0.18.tar.gz
tar xzf apache-tomcat-8.0.18.tar.gz
- 安装jenkins:
cd /opt/jenkins/apache-tomcat-8.0.18/webapps
wget http://mirrors.jenkins-ci.org/war/latest/jenkins.war
rm -rf ROOT*
mv jenkins.war ROOT.war- 启动jenkins:
/opt/jenkins/apache-tomcat-8.0.18/bin/startup.sh然后在本机用阅读器访问:http://localhost:8080/ ,可以看到jenkins的界面了。
配置jenkins
安装git插件
安装git插件:
https://wiki.jenkins-ci.org/display/JENKINS/Git+Plugin
在“系统管理”,“插件管理”,“可选插件”列表里,搜索“Git Plugin”,这样比较快可以找到。
由于jenkins用google来检查网络的连通性,所以可能在开始安装插件时会卡住1段时间。
配置maven, java
打开 http://localhost:8080/configure,
在jenkins的系统配置里,可以找到maven,git,java相干的配置,只要勾选了,在开时履行job时,会自动下载。
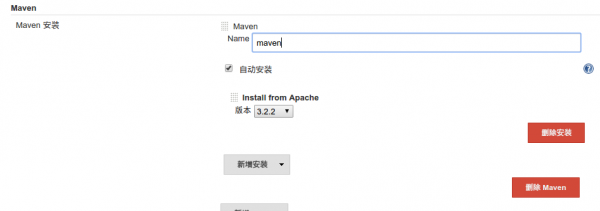
JDK可以选择刚才安装好的openjdk,也能够选择自动安装oracle jdk。

Git会自动配置好。
配置ssh服务
安装sshd服务:
sudo apt-get install openssh-server sshpass编辑
vi /etc/ssh/sshd_config
把
PermitRootLogin without-password改成:
PermitRootLogin yes重启ssh服务:
sudo /etc/init.d/ssh restart为root用户配置密码,设置为12345:
passwd最后尝试登陆下:
ssh root@127.0.0.1安装ansible
在jenkins这个container里,继续安装ansible,用来做远程发布用。
先安装pip,再用pip安装ansible:
sudo apt-get install python-pip python-dev build-essential git
sudo pip install ansible
配置ansible playbook
把自动发布的ansible playbook clone到本地:
https://github.com/hengyunabc/jenkins-ansible-supervisor-deploy
mkdir -p /opt/ansible
cd /opt/ansible
git clone https://github.com/hengyunabc/jenkins-ansible-supervisor-deploy
在jenkins上建立deploy job
新建1个maven的项目/job,名为spring-mvc-showcase
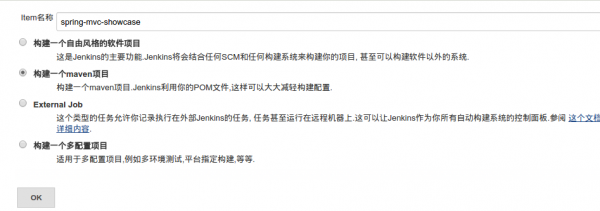
在配置页面里,勾选“参数化构建进程”,再顺次增加“String”类型的参数
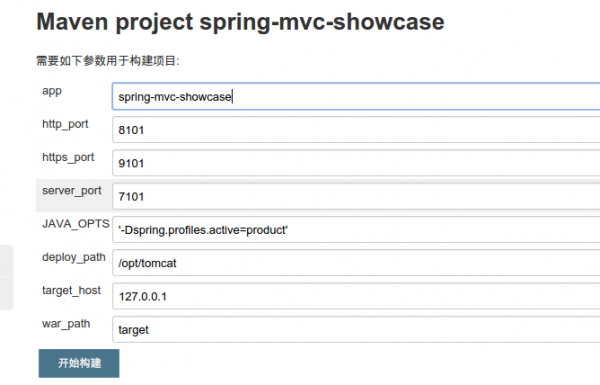
共有这些参数:
    app    要发布的app的名字
    http_port     tomcat的http端口
    https_port  tomcat的https端口
    server_port tomcat的server port
    JAVA_OPTS    tomcat启动的Java参数
    deploy_path   tomcat的目录
    target_host  要发布到哪台机器
war_path jenkins生成的war包的目录- “源码管理”,选择Git,再填入代码地址
https://github.com/spring-projects/spring-mvc-showcase.git
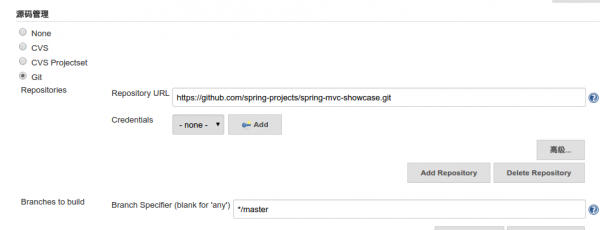
- 在“Post Steps”里,增加调用ansible playbook的shell命令

cd /opt/ansible/jenkins-ansible-supervisor-deploy
ansible-playbook -i hosts site.yml --verbose --extra-vars "target_host=$target_host app=$app http_port=$http_port https_port=$https_port server_port=$server_port deploy_path=$deploy_path JAVA_HOME=/usr JAVA_OPTS=$JAVA_OPTS deploy_war_path=$WORKSPACE/$war_path"
最后,保存。
测试构建
1切都配置好以后,可以在jenkins界面上,在左侧,选择“Build with Parameters”,“开始”来构建项目了。
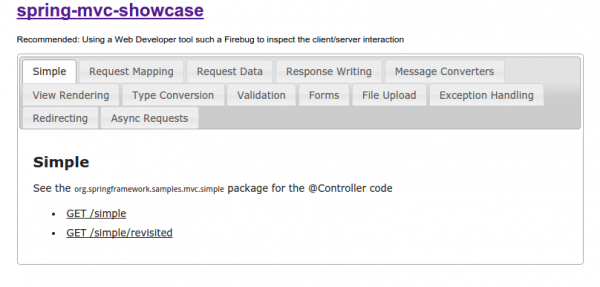
如果构建成功的话,就能够打开 http://localhost:8101 ,就能够看到spring-mvc-showcase的界面了。
打开 http://localhost:9001 可以看到superviosr的控制网页,可以查看tomcat进程的状态,重启,查看日志等。

如果想要发布到其它机器上的话,只要在
/opt/ansible/jenkins-ansible-supervisor-deploy/hosts
文件里增加相应的host配置就能够了。
其它的1些东东
如果提示
to use the 'ssh' connection type with passwords, you must install the sshpass program则安装:
sudo apt-get install sshpass演示的docker image
如果只是想查看实际运行效果,可以直接把 hengyunabc/jenkins-ansible-supervisor 这个image拉下来,运行便可。
docker run -it -p 8080:8080 -p 8101:8101 -p 9001:9001 --name='jenkins' hengyunabc/jenkins-ansible-supervisor总结
- jenkins提供了丰富的插件,可以定制自己的打包这进程,并可以提供完善的权限控制
- ansible可以轻松实现远程部署,配置环境等工作,轻量简洁,功能强大
- supervisor托管了tomcat进程,提供了web控制界面,所有运行的程序1目了然,很好用