大家如果喜欢我的博客,请关注1下我的微博,请点击这里(http://weibo.com/kifile),谢谢
转载请标明出处(http://blog.csdn.net/kifile),再次感谢
在开发进程中,单纯的 Drawable 文件没法满足我们对全部项目的需求.
有时候在制作过场动画的时候,我们会希望将1个 Drawable 文件以中心为基准,按顺时针渐渐显示出来,可是 Android 并没有为我们提供1个工具类,我们也不希望为了单纯的显示整张图片而去制作 N 张图片以满足过场动画的需求,那末我们这个时候只能斟酌对 Drawable 的绘画区域做裁剪,让他只显示扇形区域的大小,以满足我们的需求.
幸而, Android 本身有1个 ClipDrawable 类,这个类让我们能够轻松的显示进度条加载进度,本次我们也将根据这个类来创建1个类似的代码
先送上具体源码,然后我们会详细分析1下裁剪显示区域的原理
/*
* Copyright (C) 2014 Kifile(kifile@kifile.com)
*
* Licensed under the Apache License, Version 2.0 (the "License");
* you may not use this file except in compliance with the License.
* You may obtain a copy of the License at
*
* http://www.apache.org/licenses/LICENSE⑵.0
*
* Unless required by applicable law or agreed to in writing, software
* distributed under the License is distributed on an "AS IS" BASIS,
* WITHOUT WARRANTIES OR CONDITIONS OF ANY KIND, either express or implied.
* See the License for the specific language governing permissions and
* limitations under the License.
*/
package com.kifile.graphics;
import android.content.res.ColorStateList;
import android.graphics.*;
import android.graphics.drawable.Drawable;
/**
* Created by kifile on 14/10/31.
*/
public class SectorDrawable extends Drawable implements Drawable.Callback {
private Drawable mDrawable;
private Path mPath = new Path();
private float mPercent;
public SectorDrawable(Drawable drawable) {
this.mDrawable = drawable;
if (drawable != null) {
drawable.setCallback(this);
}
}
@Override
public int getChangingConfigurations() {
return super.getChangingConfigurations() | mDrawable.getChangingConfigurations();
}
@Override
public boolean getPadding(Rect padding) {
return mDrawable.getPadding(padding);
}
@Override
public boolean setVisible(boolean visible, boolean restart) {
mDrawable.setVisible(visible, restart);
return super.setVisible(visible, restart);
}
@Override
public void draw(Canvas canvas) {
mPath.reset();
RectF rect = new RectF(getBounds());
double radius = Math.pow(Math.pow(rect.right, 2) + Math.pow(rect.bottom, 2), 0.5);
mPath.moveTo(rect.right / 2, rect.bottom / 2);
mPath.lineTo(rect.right / 2, 0);
if (mPercent > 0.125f) {
mPath.lineTo(rect.right, 0);
}
if (mPercent > 0.375f) {
mPath.lineTo(rect.right, rect.bottom);
}
if (mPercent > 0.625f) {
mPath.lineTo(0, rect.bottom);
}
if (mPercent > 0.875f) {
mPath.lineTo(0, 0);
}
mPath.lineTo((float) (rect.right / 2 + radius * Math.sin(Math.PI * 2 * mPercent)),
(float) (rect.bottom / 2 - radius * Math.cos(Math.PI * 2 * mPercent)));
mPath.close();
if (mPercent >= 0 && mPercent <= 1) {
canvas.save();
canvas.clipPath(mPath);
mDrawable.draw(canvas);
canvas.restore();
}
}
@Override
public void setAlpha(int alpha) {
mDrawable.setAlpha(alpha);
}
@Override
public int getAlpha() {
return mDrawable.getAlpha();
}
@Override
public void setColorFilter(ColorFilter cf) {
mDrawable.setColorFilter(cf);
}
@Override
public void setTintList(ColorStateList tint) {
mDrawable.setTintList(tint);
}
@Override
public void setTintMode(PorterDuff.Mode tintMode) {
mDrawable.setTintMode(tintMode);
}
@Override
public int getOpacity() {
// TODO Auto-generated method stub
return mDrawable.getOpacity();
}
@Override
public boolean isStateful() {
// TODO Auto-generated method stub
return mDrawable.isStateful();
}
@Override
protected boolean onStateChange(int[] state) {
return mDrawable.setState(state);
}
@Override
protected boolean onLevelChange(int level) {
mDrawable.setLevel(level);
invalidateSelf();
return true;
}
@Override
protected void onBoundsChange(Rect bounds) {
mDrawable.setBounds(bounds);
}
@Override
public int getIntrinsicHeight() {
return mDrawable.getIntrinsicHeight();
}
@Override
public int getIntrinsicWidth() {
return mDrawable.getIntrinsicWidth();
}
/**
* 显示的区域范围
*
* @param percent 0至1
*/
public void setPercent(float percent) {
if (percent > 1) {
percent = 1;
} else if (percent < 0) {
percent = 0;
}
if (percent != mPercent) {
this.mPercent = percent;
invalidateSelf();
}
}
@Override
public void invalidateDrawable(Drawable who) {
final Callback callback = getCallback();
if (callback != null) {
callback.invalidateDrawable(this);
}
}
@Override
public void scheduleDrawable(Drawable who, Runnable what, long when) {
final Callback callback = getCallback();
if (callback != null) {
callback.scheduleDrawable(this, what, when);
}
}
@Override
public void unscheduleDrawable(Drawable who, Runnable what) {
final Callback callback = getCallback();
if (callback != null) {
callback.unscheduleDrawable(this, what);
}
}
}
从上面的代码可以看出,我们使用了装潢者模式来处理本类,首先我们在构造函数中传入1个实际的 Drawable 对象,并将各种事务交给了 Drawable 对象进行处理,我们只负责对 draw 方法的重写,所以我们可以好好来看看 draw 方法.
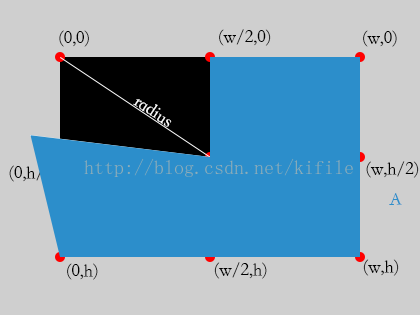
首先大家先来看1张图:
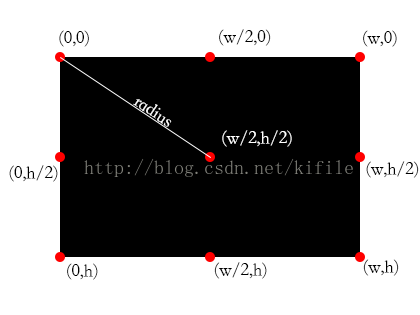
黑色部份为画布区域, w 为宽度, h 为高度, radius 为中心点到角的距离,上图中为我们标明了9个重要的坐标点位置,接下来我们将介绍如何根据旋转角度来设置选定区域范围
首先我们先规定扇形区域的起始位置为(w/2,0)处,旋转方式为顺时针旋转,并假定有1 A 点为扇形旋转区域另外一边的,长度为 radius(关于 radius 的定义请参看上面) 的边角
(1)当旋转区域不超过1/8时,扇形区域的绘制以下:
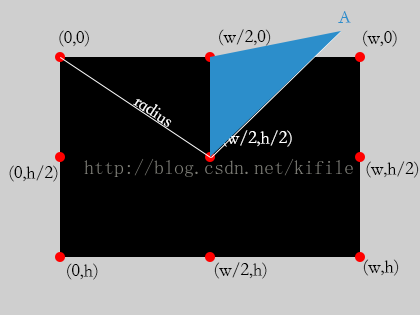
那末由图可知,我们需要裁减的区域为上图中的蓝色区域便可
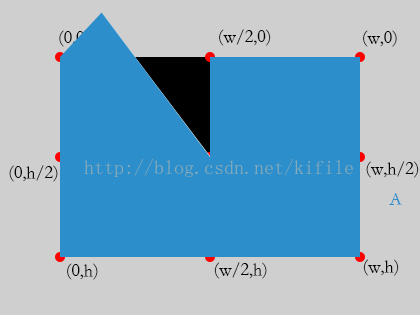
(2)对旋转区域超过1/8,不超过3/8时,扇形区域绘制以下:
由图可知,我们需要裁减的蓝色区域,可由,中心点,起始点,右上角和 A 点连线组成
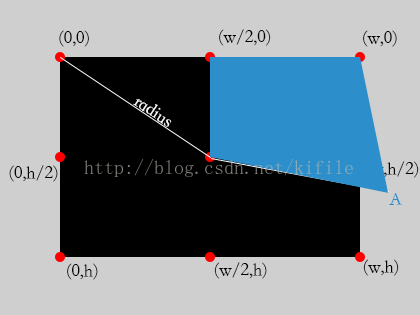
(3)对旋转区域超过3/8不超过5/8时,扇形区域绘制以下:
由图可知,我们需要裁减的蓝色区域,可由,中心点,起始点,右上角,右下角和 A 点连线组成
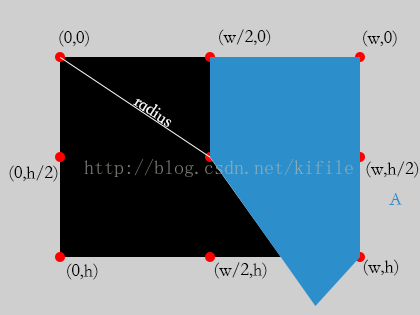
(4)对超过5/8,不超过7/8的部份,裁剪区域以下:
(5)对超过7/8的部份而言,裁减区域以下
因此我们可以通过判断设定的显示区域,动态对画布进行裁减,以到达显示扇形区域的目的
具体的设置代码,就在顶部,大家如果有兴趣可以详细看看,接下来我们将查看如何正确使用 SectorDrawable
ImageView img = (ImageView) findViewById(R.id.sector_img);
mDrawable = new SectorDrawable(img.getDrawable());
img.setImageDrawable(mDrawable);
在这段代码中,我们从 ImageView 中获得了1个 Drawable 对象,然后使用 SectorDrawable 来装潢他,然后将 setctorDrawable, 再设置到 ImageView 中
当我们需要调用代码进行区域显示设置时,使用
mDrawable.setPercent(percent);
详细的1个 Activity 示例以下:
/*
* Copyright (C) 2014 Kifile(kifile@kifile.com)
*
* Licensed under the Apache License, Version 2.0 (the "License");
* you may not use this file except in compliance with the License.
* You may obtain a copy of the License at
*
* http://www.apache.org/licenses/LICENSE⑵.0
*
* Unless required by applicable law or agreed to in writing, software
* distributed under the License is distributed on an "AS IS" BASIS,
* WITHOUT WARRANTIES OR CONDITIONS OF ANY KIND, either express or implied.
* See the License for the specific language governing permissions and
* limitations under the License.
*/
package com.kifile.sample.app;
import android.os.Bundle;
import android.os.Handler;
import android.os.Message;
import android.support.v7.app.ActionBarActivity;
import android.util.Log;
import android.view.Menu;
import android.view.MenuItem;
import android.widget.ImageView;
import com.kifile.graphics.SectorDrawable;
public class MainActivity extends ActionBarActivity {
private SectorDrawable mDrawable;
private Handler mHandler = new Handler() {
private float percent;
@Override
public void handleMessage(Message msg) {
super.handleMessage(msg);
if (percent <= 1) {
percent += 0.01;
} else {
percent = 0;
return;
}
mDrawable.setPercent(percent);
Log.i("this",String.valueOf(percent));
sendEmptyMessageDelayed(0, 10);
}
};
@Override
protected void onCreate(Bundle savedInstanceState) {
super.onCreate(savedInstanceState);
setContentView(R.layout.activity_main);
ImageView img = (ImageView) findViewById(R.id.sector_img);
mDrawable = new SectorDrawable(img.getDrawable());
img.setImageDrawable(mDrawable);
}
@Override
public boolean onCreateOptionsMenu(Menu menu) {
// Inflate the menu; this adds items to the action bar if it is present.
getMenuInflater().inflate(R.menu.menu_main, menu);
return true;
}
@Override
public boolean onOptionsItemSelected(MenuItem item) {
// Handle action bar item clicks here. The action bar will
// automatically handle clicks on the Home/Up button, so long
// as you specify a parent activity in AndroidManifest.xml.
int id = item.getItemId();
//noinspection SimplifiableIfStatement
if (id == R.id.action_settings) {
mHandler.sendEmptyMessage(0);
return true;
}
return super.onOptionsItemSelected(item);
}
}
这段代码将在点击菜单按钮的时候触发事件,使用 handler 不断刷新显示区域,起到扇形区域显示的目的.
好了,本次博客就到这里了,谢谢大家的翻阅