Apache + tomcat实现服务器集群
主要参照:http://blog.csdn.net/welun521/article/details/4169879

采用JK_PROXY方式实现!后续会研究ajp方式,也会出文档,待续……!
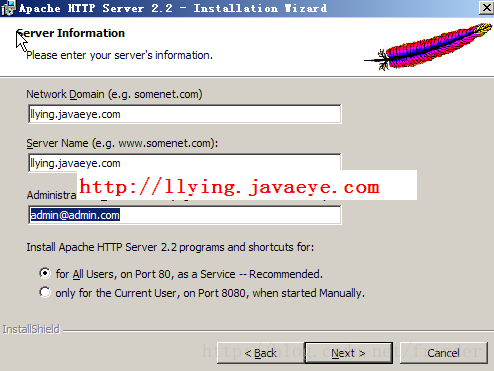
一、apache安装
主要参照:http://llying.iteye.com/blog/335342
注:以上输入必须按给的格式,邮箱最好输入一个可用的!我在第一次安装的时候就是没按格式输入,结果不能启动,只好卸了重装,应该是可以修改的,但没研究^-^!
二、tomcat安装
略
三、apache配置
注:修改httpd.conf时,最好用记事本打开,不要用别的edit工具!
这是配置后的conf目录,在apache配置时,特别注意,首先给httpd.conf做个备份,因为在配置的过程中发现一些很怪异的现象,无缘无故就不能用了!最发做好备份,万一配置错误起码能恢复到最初状态,这个应该是一个各格程序员的基本涵养吧^_^!
下面开始详细配置:
1、 将mod_jk-1.2.26-httpd-2.2.4.so在Apache2/modules目录下
2、 创建mod_jk.conf文件,内容如下:
#加载mod_jk Module
LoadModule jk_module modules/mod_jk-1.2.26-httpd-2.2.4.so
#指定 workers.properties文件路径
JkWorkersFile conf/workers.properties
#指定那些请求交给tomcat处理,"controller"为在workers.propertise里指定的负载分配控制器
JkMount /*.jsp controller
#如果还要指定*.do也进行分流就再加一行
#JkMount /*.do controller
#如果你想对所有的请求进行分流只需要写成
JkMount /* controller
注:实用过程中最好把注释性的汉字去掉,防止出错!(不需要的用户“#”注释掉)
其实不加这个文件也能实现,不过需要在httpd.conf中配置,为不影响原文件,就再加个吧!
有了这个文件后,我们只需要在httpd.conf中加上:
Include conf/mod_jk.conf
就可以了,有些说加到文件最后,但我还是习惯放在有Include标签的后面,这个随便哈!
3、 在conf下添加work.properties文件,内容如下:
worker.list =controller,tomcat1,tomcat2 #server 列表
#========tomcat1========
worker.tomcat1.port=8009 #ajp13端口号,在tomcat下server.xml配置,默认8009
worker.tomcat1.host=localhost #tomcat的主机地址,如不为本机,请填写ip地址
worker.tomcat1.type=ajp13
worker.tomcat1.lbfactor = 1 #server的加权比重,值越高,分得的请求越多
#========tomcat2========
worker.tomcat2.port=8109 #ajp13端口号,在tomcat下server.xml配置,默认8009
worker.tomcat2.host=localhost #tomcat的主机地址,如不为本机,请填写ip地址
worker.tomcat2.type=ajp13
worker.tomcat2.lbfactor = 2 #server的加权比重,值越高,分得的请求越多
#========controller,负载均衡控制器========
worker.controller.type=lb
worker.controller.balanced_workers=tomcat1,tomcat2 #指定分担请求的tomcat
worker.controller.sticky_session=1
以上配置都很明确。如果还想添加tomcat,按上面配置添加即可!
四、Tomcta配置
Tomcata配置并无特别之处,主要的是要是在同一台机器上配置不同tomcat时需要注意的是要将第二个tomcat的端口号修改下,不要与第一个冲突,不然无法启动!
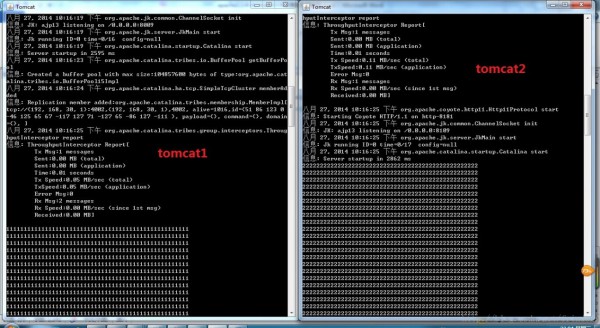
在session共享时,需要添加如下配置,在tomcat的server.xml中并没有这么多,这是在网上查的,不过,已经测试过,可以正常使用!配置如下:
<Cluster className="org.apache.catalina.ha.tcp.SimpleTcpCluster"channelSendOptions="6">
<Manager className="org.apache.catalina.ha.session.BackupManager"expireSessionsOnShutdown="false"notifyListenersOnReplication="true"mapSendOptions="6"/>
<Channel className="org.apache.catalina.tribes.group.GroupChannel">
<Membership className="org.apache.catalina.tribes.membership.McastService"address="228.0.0.4" port="45564" frequency="500"dropTime="3000"/>
<Receiver className="org.apache.catalina.tribes.transport.nio.NioReceiver" address="auto" <span style="color:#ff0000;">port="4001"</span>selectorTimeout="100"maxThreads="6"/>
<Sender className="org.apache.catalina.tribes.transport.ReplicationTransmitter">
<Transport className="org.apache.catalina.tribes.transport.nio.PooledParallelSender"/>
</Sender>
<Interceptor className="org.apache.catalina.tribes.group.interceptors.TcpFailureDetector"/>
<Interceptor className="org.apache.catalina.tribes.group.interceptors.MessageDispatch15Interceptor"/>
<Interceptor className="org.apache.catalina.tribes.group.interceptors.ThroughputInterceptor"/>
</Channel>
<Valve className="org.apache.catalina.ha.tcp.ReplicationValve"filter=".*.gif|.*.js|.*.jpeg|.*.jpg|.*.png|.*.htm|.*.html|.*.css|.*.txt"/>
<Deployer className="org.apache.catalina.ha.deploy.FarmWarDeployer"tempDir="/tmp/war-temp/" deployDir="/tmp/war-deploy/"watchDir="/tmp/war-listen/" watchEnabled="false"/>
<ClusterListener className="org.apache.catalina.ha.session.ClusterSessionListener"/>
</Cluster>
红色部分需要注意下,两个tomcat不要重复,其它不用修改!
如此,就能实现session共享!
五、测试项目
tomcat1中index.jsp内容如下:
<%@ page language="java"contentType="text/html; charset=utf-8"
pageEncoding="utf-8"%>
<%@ pagesession="false"%>
<!DOCTYPE htmlPUBLIC "-//W3C//DTD HTML 4.01 Transitional//EN""http://www.w3.org/TR/html4/loose.dtd">
<html>
<head>
<metahttp-equiv="Content-Type" content="text/html;charset=ISO-8859-1">
<title>Inserttitle here</title>
</head>
<body>
This is my JSP page.tomcat-A
<br>
<%
HttpSessionmysession = request.getSession(false);
if (mysession ==null) {
mysession= request.getSession(true);
mysession.setAttribute("appname","value-A");
out.println("newsession:" + mysession.getId());
} else {
out.println("oldsession:" + mysession.getId());
}
out.println("appname="+ mysession.getAttribute("appname"));
System.out.println("1111111111111111111111111111111111111111111111111111");
%>
</body>
</html>
tomcat2下的index.jsp内容如下:
<%@ pagelanguage="java" contentType="text/html; charset=utf-8"
pageEncoding="utf-8"%>
<%@ pagesession="false"%>
<!DOCTYPE htmlPUBLIC "-//W3C//DTD HTML 4.01 Transitional//EN""http://www.w3.org/TR/html4/loose.dtd">
<html>
<head>
<metahttp-equiv="Content-Type" content="text/html;charset=ISO-8859-1">
<title>Inserttitle here</title>
</head>
<body>
This is my JSP page.tomcat-B
<br>
<%
HttpSessionmysession = request.getSession(false);
if (mysession ==null) {
mysession= request.getSession(true);
mysession.setAttribute("appname","value-B");
out.println("newsession:" + mysession.getId());
} else {
out.println("oldsession:" + mysession.getId());
}
out.println("appname="+ mysession.getAttribute("appname"));
System.out.println("22222222222222222222222222222222222222222222222222");
%>
</body>
</html>
最后测试结果:
页面效果:

注意这几个点!